How to Create a Wall Framing Plan (Step-by-Step Guide)
Most wall framing mistakes happen before the wall is built. A weak framing layout, missing opening detail, or wrong stud spacing can turn into wasted timber, slower installs, and expensive rework once the job reaches site.
This guide shows how to create a wall framing plan from scratch, how to build a clear wall framing layout, what information you need before you start, where manual layouts usually go wrong, and how an online wall planning tool can speed the process up.
Wall framing plan, framing layout, stud spacing, and opening placement.
Builders, designers, estimators, owner-builders, and prefabrication teams.
Small layout mistakes can affect material waste, sheet joints, and structural details.
Get to a clear, buildable wall plan faster and with fewer redraws.
What is a wall framing plan in timber framing?
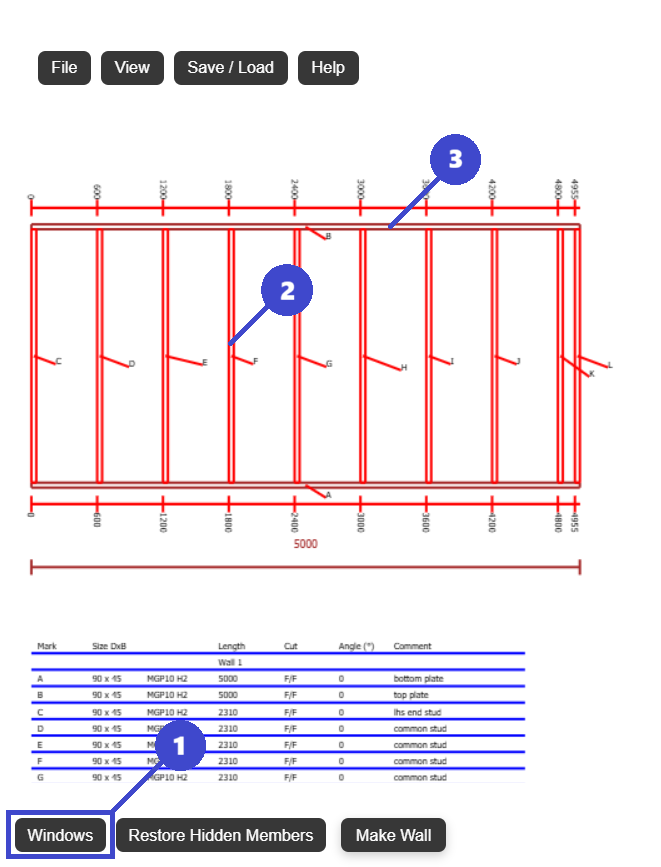
A wall framing plan is the layout that shows how a wall will actually be built. It turns a wall dimension into a buildable framing layout with exact members and exact spacing.
Typical wall framing plan contents
- Stud layout and stud spacing
- Top and bottom plate layout
- Door and window openings
- Headers, king studs, and jack studs
- Wall length, wall height, and timber sizes
- Any framing notes needed for fabrication or site install
Why accuracy matters
The framing plan affects structural performance, lining and sheet layout, ordering, cutting, and site speed. If the plan is wrong, the error spreads into material waste, delays, and rework.
Information you need before starting a wall framing layout
Good framing layouts start with good inputs. This is the minimum checklist to collect before you draw anything.
Wall geometry
- Wall length
- Wall height
- Any pitch, rake, or stepped profile
Framing rules
- Stud spacing such as 16 in, 24 in, 450 mm, or 600 mm
- Timber size or section type
- Sheeting or cladding module to align with
Openings and compliance
- Window and door sizes
- Opening locations
- Header sizing and local building code requirements
Manual method: the traditional way to create a wall framing layout
This is how many builders still do it on paper, in spreadsheets, or in general drafting software. It works, but it takes time and leaves more room for missed details.
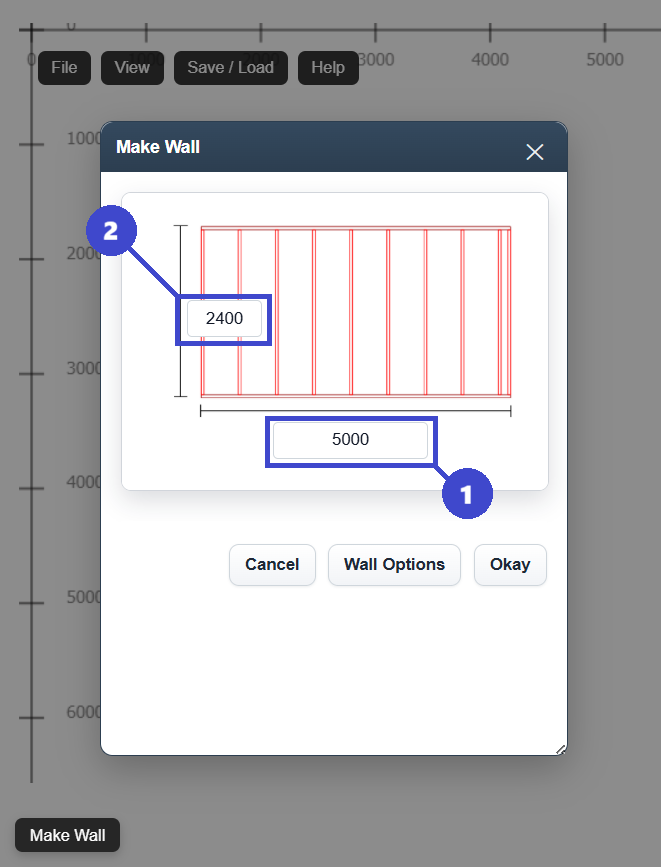
Draw the wall length and wall height
Start with the outside dimensions so you have a base for every plate, stud, and opening.
Mark stud spacing
Lay out the stud centres across the wall and then resolve what happens at each end condition.
Add all openings
Insert doors and windows with rough opening sizes, then adjust the surrounding studs.
Add headers and trimmers
Confirm the framing around each opening, including king studs, jack studs, and header members.
Calculate the timber list
Count members, check lengths, and review waste before you send the plan to site or fabrication.
Where the manual method slows down
- Each change can force a partial redraw
- Opening changes ripple into stud and header counts
- Sheet layout often gets checked too late
- Material takeoffs can drift from the latest revision
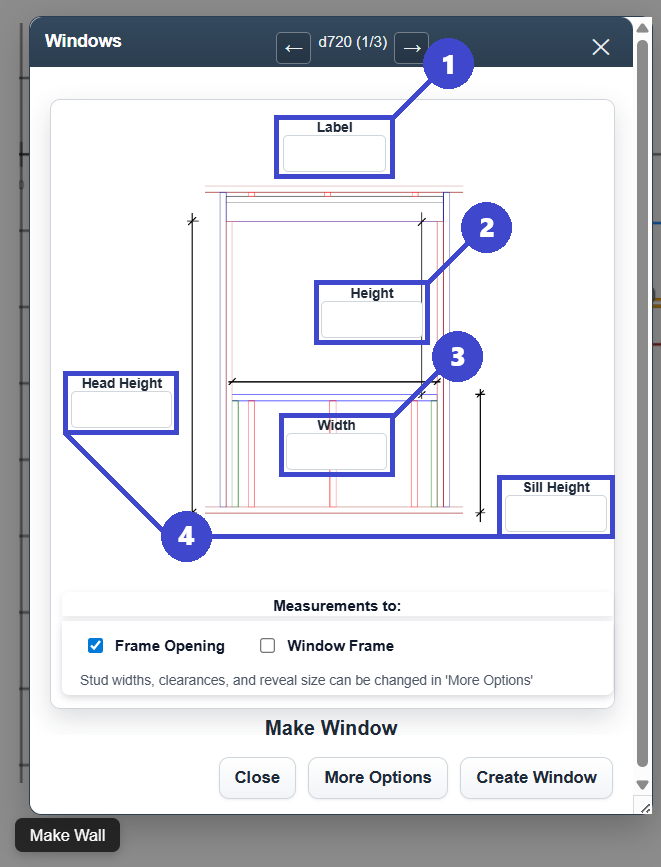
How to add window and door openings to a wall framing plan
Openings are where a simple wall framing layout becomes a real framing plan. Every window and door changes the stud layout, affects the header area, and needs to be shown clearly before the wall is built.
Start with the rough opening size
Use the actual rough opening dimensions, not just the nominal window or door size, so the framing layout matches what will be installed onsite.
Set the opening position
Measure from a consistent reference point so the opening location is clear on the wall framing plan and easy to set out during construction.
Add the supporting framing members
Show the header, king studs, jack studs, sill where required, and any cripple studs above or below the opening.
Check the stud spacing around the opening
Openings interrupt the normal stud centres, so the surrounding framing needs to be checked rather than assumed from the base wall layout.
Review clashes and sheet layout
Before finalising the wall plan, check that the opening works with cladding, lining, fixing points, and the rest of the framing members.
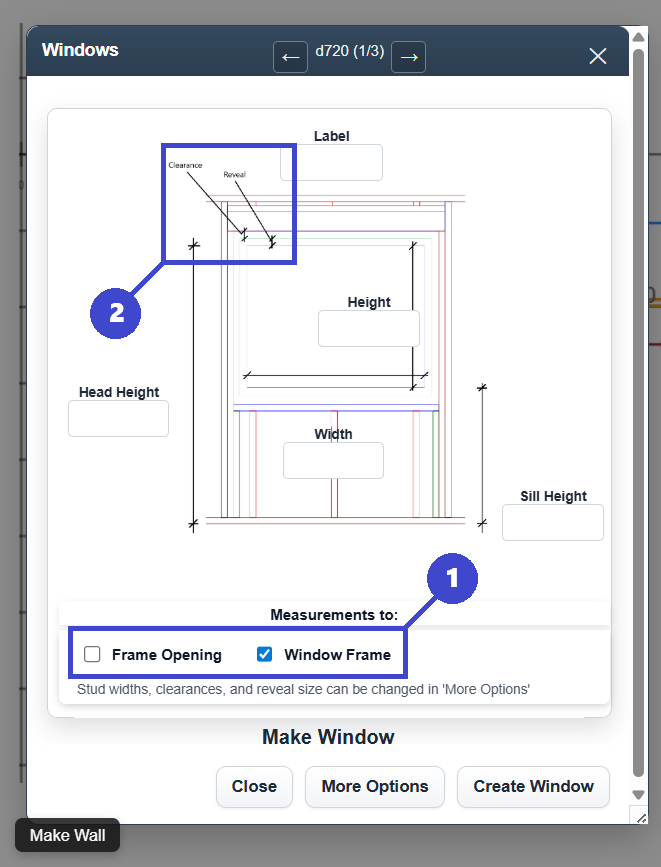
Opening checklist
- Confirm rough opening width and height
- Confirm the exact opening location on the wall
- Confirm header size and support members
- Confirm sill framing for window openings
- Check the updated cutting list after each opening change
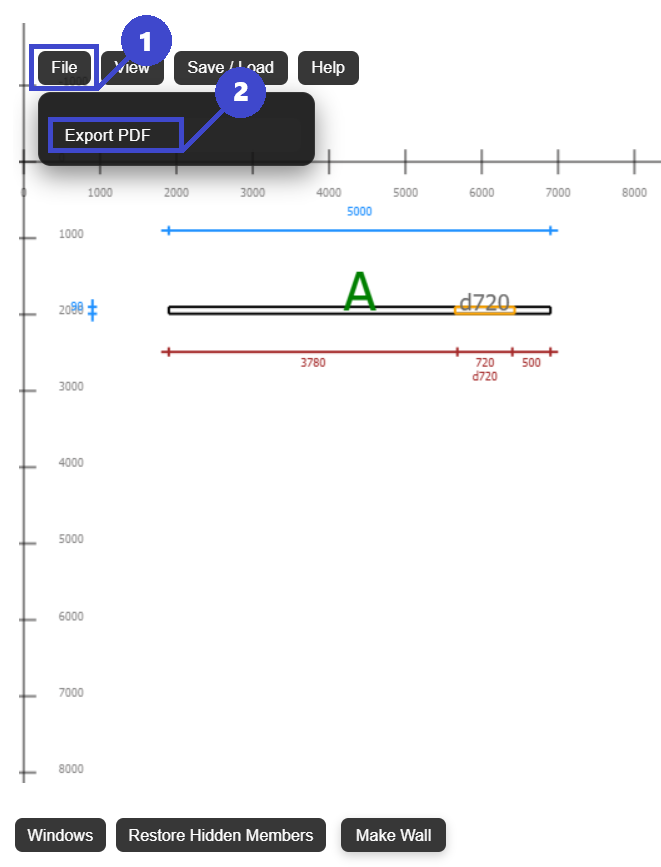
The faster method: use an online wall planning tool for framing plans
If you are creating framing plans regularly, software is usually the better workflow. Instead of redrawing every revision, you update the wall inputs and regenerate the framing layout.
- Generate wall framing layouts faster from the wall dimensions
- Place and adjust openings without rebuilding the whole plan
- Check the wall visually before it reaches site
- Export the framing plan to PDF for review or construction
- Use the cutting list workflow to support ordering and fabrication
FramingPlans is built for exactly this kind of task: fast wall planning, opening placement, 3D checks, and export-ready framing documentation.
You can also review related guides for flat walls, raked walls, gable walls, and PDF export.
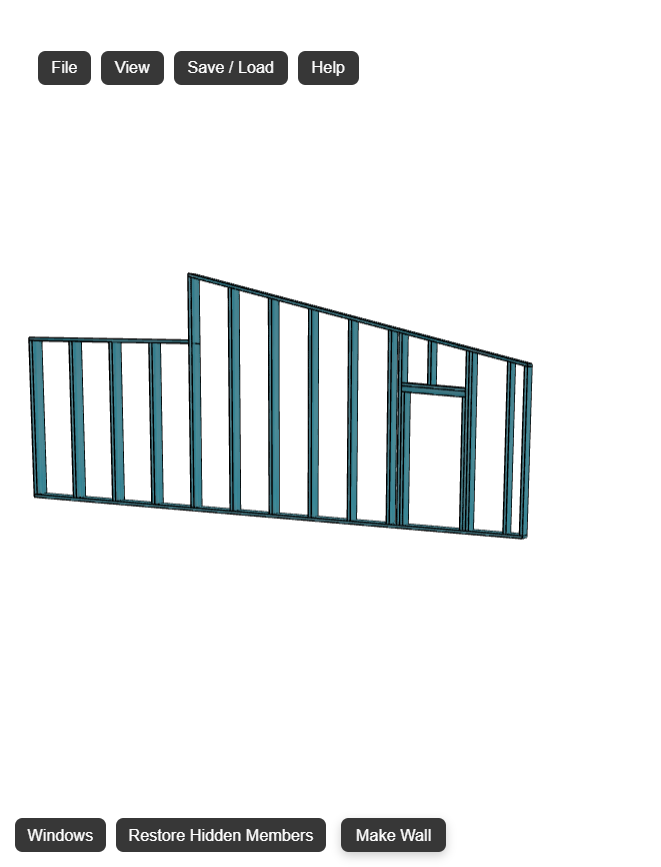
What improves with software
The main gain is not just speed. It is consistency. The layout, the member updates, and the export stay tied to the latest wall revision instead of being spread across separate sketches and notes.
Common wall framing plan and framing layout mistakes
These are the issues that show up again and again in framing layouts. Catching them early protects both the plan and the budget.
Incorrect stud spacing
Stud centres that drift from the intended module can affect strength, lining support, and sheet joints.
Forgetting king studs
Openings need complete support framing, not just the header and a pair of trimmers.
Wrong header sizing
Header requirements vary by span, load, and local code. Guessing here is risky.
No sheet layout check
Ignoring board or sheathing modules can create awkward joints, waste, and extra labour onsite.
Unplanned timber waste
Without a clear cutting list or member count, waste rises and ordering becomes less reliable.
Downloadable wall framing plan checklist
Use this as a quick pre-start review before you finalise a framing layout or export a plan for site.
Checklist items
- Confirm wall length, wall height, and any pitch
- Confirm stud spacing and timber size
- Confirm all window and door rough opening sizes
- Confirm header, king stud, and jack stud details
- Check sheet layout and member conflicts
- Review the cutting list before export or ordering
Quick answers
These short definitions help both readers and search engines understand the page quickly.
What is the difference between a framing plan and a wall framing plan?
A framing plan can refer to a broader structural layout. A wall framing plan focuses specifically on how a wall is framed, including studs, plates, openings, and supporting members.
What spacing is common in wall framing layouts?
Common stud spacing is 16 inches or 24 inches on centre in imperial systems, or 450 mm or 600 mm in metric systems, depending on the project and code requirements.
Why use an online wall planning tool?
An online wall planning tool can reduce redraw time, make layout changes easier, improve consistency, and produce export-ready framing plans faster.
Wall framing plan summary
If you only remember one thing, remember this: a good wall framing plan is clear, buildable, and easy to update when dimensions or openings change.
Start with the wall layout
Set wall length, wall height, and stud spacing before adding detail.
Add openings properly
Doors and windows need exact rough openings and complete support framing.
Check output before site
Review sheet layout, member counts, and exported drawings before construction starts.
Build your wall framing plan faster
Whether you are planning a single wall or a full set of framing layouts, the goal is the same: clear dimensions, correct openings, reliable member placement, and a plan that is ready to build from.
If you want a faster way to create a wall framing plan online, update openings without redrawing, and export a cleaner framing layout, open FramingPlans and start with your first wall.
Continue with the Wall Framing Layout Calculator guide or browse all framing resources at framingplans.com/blog.