Wall Framing Layout Calculator
A wall framing layout calculator is a method for mapping studs, plates, openings, and structural members from wall dimensions before timber is cut. Builders use it to plan stud spacing, rough opening positions, and header locations so the wall can be framed accurately and built faster on site.
This guide explains how the calculator workflow works, how to run the same process manually, what errors to avoid, and when it makes sense to switch from hand-marking to a digital framing layout process.
Calculate stud positions, top plate and bottom plate layout, and rough openings.
Builders, carpenters, contractors, estimators, prefab teams, and DIY home builders.
More reliable framing details with less on-site adjustment and rework.
A buildable wall framing layout linked to current dimensions and opening changes.
What Is a Wall Framing Layout Calculator?
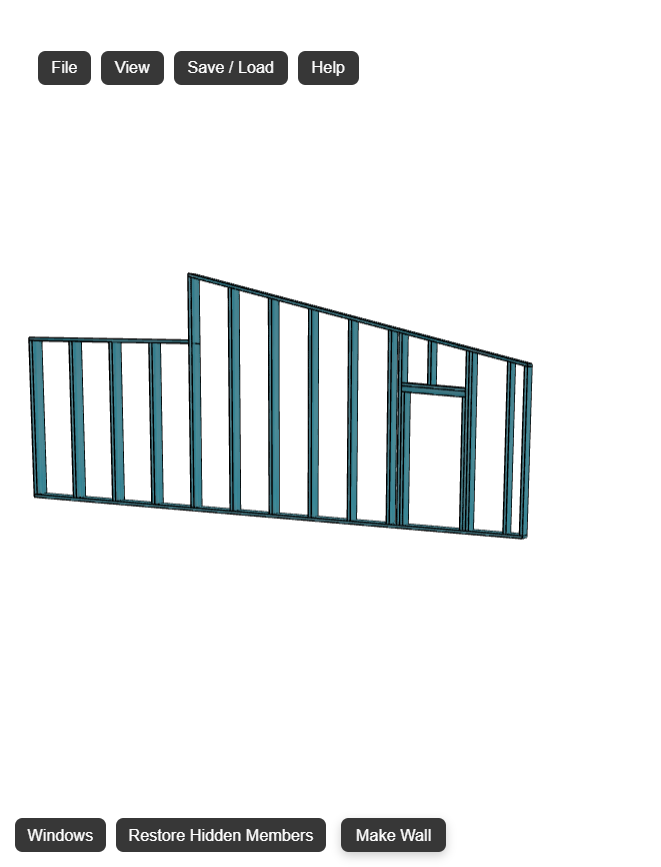
A wall framing layout calculator is a planning approach that converts wall geometry into a framing map with exact member locations. It helps identify where each stud, plate, opening, header, king stud, and jack stud sits before construction starts.
What the calculator usually includes
- Wall length and wall height settings
- Stud spacing rules (for example 400 mm, 450 mm, 600 mm, 16 in, or 24 in)
- Top plate and bottom plate member paths
- Door and window rough opening positions
- Header location and supporting studs
- A check of framing quantities before ordering timber
What it is not
It is not a substitute for engineering certification when engineering is required. It is a layout and quantity planning workflow that improves framing accuracy and communication, then supports code and structural review.
Why It Matters in Wall Framing
Wall framing errors are often small on paper but expensive on site. A missed stud center or incorrect rough opening can delay cladding, lining, door installation, and inspections.
Accurate stud placement
Consistent stud spacing keeps loads predictable and helps board joints land where they should. This improves fixing quality and reduces ad-hoc blocking during installation.
Correct openings
Window and door framing needs exact rough opening dimensions, proper header support, and correct jack stud locations. Planning this early avoids field recuts and patch framing.
Faster construction
A clear layout lets teams prefabricate or cut in sequence. When each member has a known location, assembly time drops and supervision is simpler.
Step-by-Step Guide: Manual Wall Framing Layout Calculation
Builders can complete the process by hand with tape, plans, and a framing square. The sequence below is a practical baseline used across residential and light commercial timber framing.
Determine wall length and wall height
Confirm the actual framed dimensions from the latest plans, not an outdated revision. Layout errors usually begin when dimensions are copied from earlier drawings.
Choose stud spacing for the wall type
Select spacing to suit structural needs and sheathing modules. Typical values are 400 mm or 600 mm in many metric jobs, and 16 in or 24 in on center in imperial jobs.
Mark stud positions on top and bottom plates
Start from a consistent reference edge and mark each center line. Keep plate marks readable so framing crews can move quickly without re-measuring every position.
Add window and door rough openings
Place each opening at its exact location and size, then re-check stud breaks. Around openings, account for king studs, jack studs, cripple studs, sill members, and load transfer.
Calculate headers and supporting members
Size and position each header according to span, load path, and local requirements. Finish by checking the complete member count against the intended timber order.
Where manual workflows lose time
- Changes trigger repeated re-marking on plates and drawings
- Opening moves affect several framing members at once
- Material counts drift if the latest revision is not tracked
- Different team members may work from different assumptions
Wall Framing Layout Examples and Practical Considerations
Field conditions vary, but a few framing examples cover most day-to-day jobs. Use these checks to keep your wall framing layout calculator outputs practical and build-ready.
Stud spacing examples
A 4,800 mm wall at 600 mm centers behaves differently from the same wall at 400 mm centers. Tighter spacing increases member count and can improve cladding support but changes takeoff volume. If you need a deeper breakdown, review this stud spacing guide and compare your sheathing module against structural requirements.
Wall layout around openings
A centered window may keep stud distribution balanced, while an offset opening can create short stud bays and force additional checks at sheet joints. When openings move, validate rough opening tolerance and verify header support before finalizing your window framing layout.
General framing layout considerations
- Align stud centers with cladding or plasterboard edges where practical
- Keep reference datums clear so site setout matches workshop assumptions
- Check door swing and trim clearances before freezing rough openings
- Reconfirm top plate and bottom plate continuity at wall intersections
- Capture revisions in one source to avoid mixed framing instructions
Teams that need a broader process can pair this calculator workflow with a full wall framing plan guide so design intent, site marking, and fabrication details stay aligned.
Common Mistakes in Wall Framing Layout Calculation
Most framing issues are preventable when checks are done in sequence. These are frequent mistakes and the simplest ways to avoid them.
Incorrect stud spacing
Spacing drift causes sheathing joint issues. Lock one datum edge and verify cumulative marks.
Missing jack studs
Headers need proper support. Confirm king studs and jack studs at every structural opening.
Wrong rough opening size
Using nominal unit size can force rework. Always frame to required rough opening dimensions.
Header placement errors
Incorrect header height affects finish levels and clearances. Check against door and window specs.
No final revision check
Outdated plans lead to wasted timber. Confirm all crews are working from the latest layout set.
Wall Framing Terminology
Use consistent terms across designers, builders, and suppliers so framing decisions are interpreted the same way on every job.
| Term | Meaning |
|---|---|
| Stud | Vertical framing member that transfers wall loads to the bottom plate and floor system. |
| Top plate | Horizontal member at the top of the wall that ties studs together and supports roof or floor loads. |
| Bottom plate | Base plate fixed to the floor or slab that sets stud positions and wall alignment. |
| Header | Structural member above a door or window opening that carries load across the opening. |
| Jack stud | Short stud that supports the header at each side of an opening. |
| King stud | Full-height stud adjacent to an opening that helps transfer load and stiffen the wall. |
| Rough opening | Framed opening size required for window or door installation including tolerances. |
Using a Digital Wall Framing Layout Tool
Framing layouts can be drawn manually, but digital workflows are usually faster once revisions start. The key advantage is consistency: layout, openings, and exports stay tied to one live model.
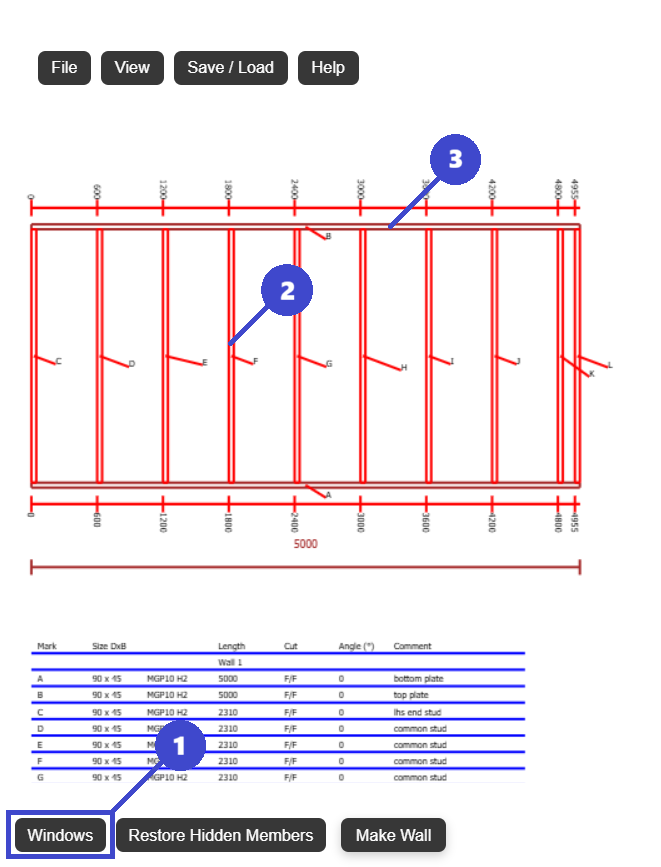
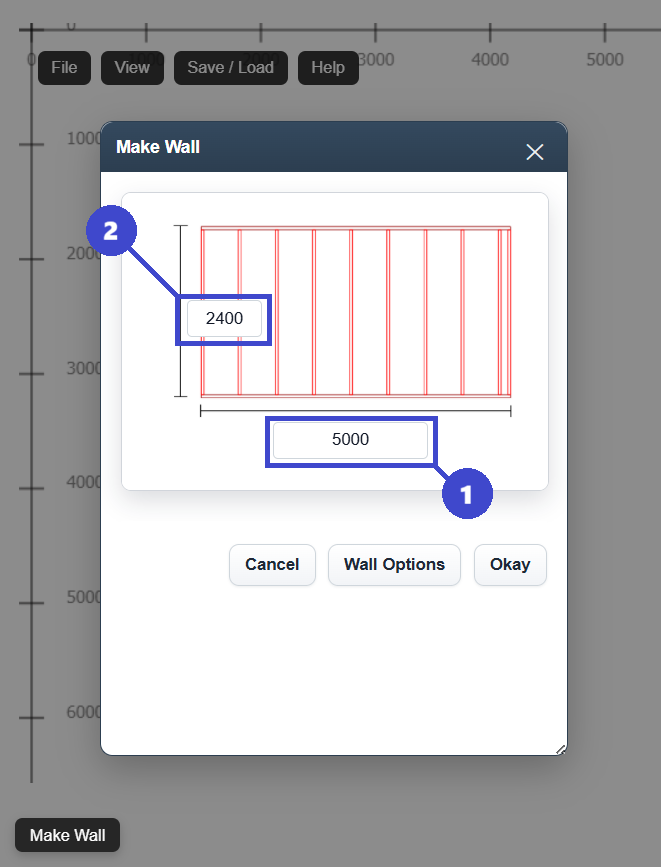
- Generate wall framing layouts automatically from wall dimensions and spacing settings
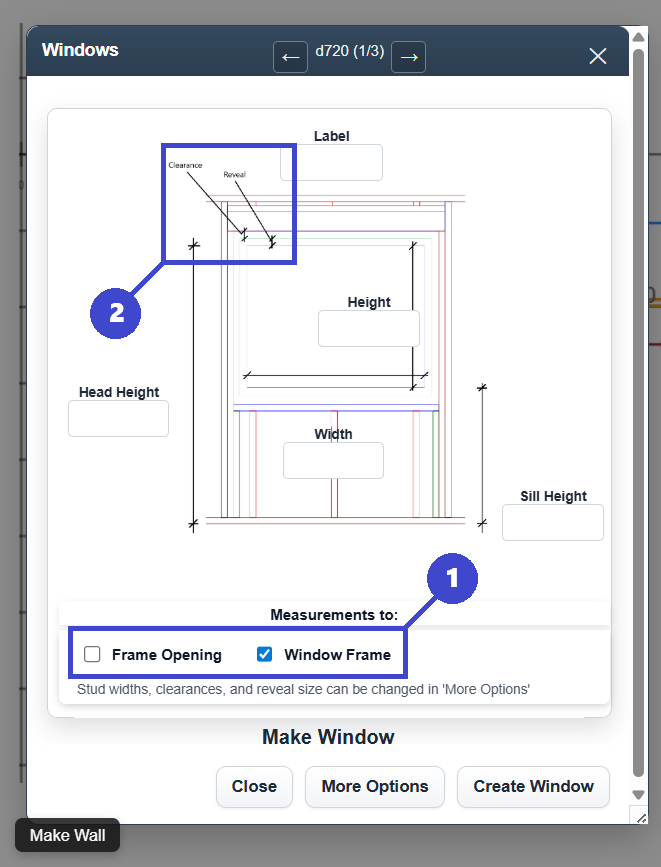
- Place studs, windows, and doors with clear rough opening control
- Update headers and support members as openings change
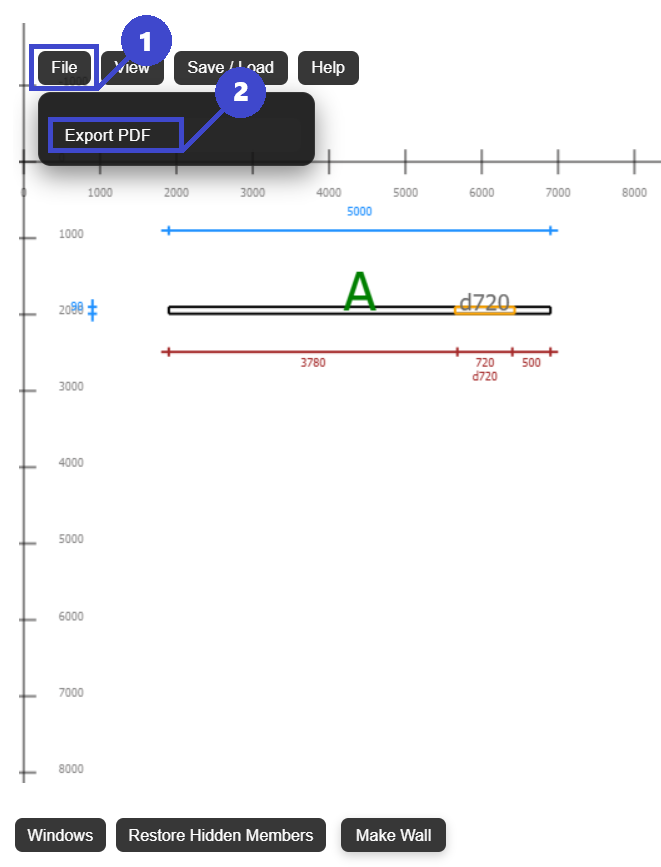
- Export framing plans as PDFs for shop, client, or site communication
- Reduce redraw time and keep latest revisions in one place
FramingPlans can be used as a practical framing layout calculator when you need fast iteration without losing detail quality.
Manual vs digital in practice
Manual methods still work for one-off walls, but digital tools help when jobs include multiple openings, repeated revisions, or prefabrication requirements. The faster you can validate layout changes, the fewer downstream surprises show up during install.
Frequently Asked Questions
These short answers are written in clear reference format for quick on-site checks and planning reviews.
What is the standard stud spacing for wall framing?
Common spacing is 16 in or 24 in on center in imperial systems, and 400 mm, 450 mm, or 600 mm in metric systems. Final spacing depends on code, loading, sheathing type, and project specification.
What does a wall framing layout calculator calculate?
It calculates framing member positions including studs, top and bottom plates, opening framing, and support members like headers and jack studs. It also helps verify quantities before material ordering.
How do you frame around a door or window opening?
Set the correct rough opening first, then frame the opening with king studs, jack studs, and a header. For windows, include sill framing and cripple studs as required by the wall design.
Can DIY home builders use a wall framing layout calculator?
Yes, especially for planning and quantity checking. DIY builders should still verify local compliance, structural requirements, and permit conditions before construction.
How can I avoid framing calculation mistakes?
Use one current dimension source, mark from a fixed datum, confirm rough openings against manufacturer data, and run a final check of headers, jack studs, and stud spacing before cutting material.
Conclusion
A reliable wall framing layout calculator process starts with accurate dimensions, applies clear stud spacing rules, handles rough openings correctly, and confirms headers and support members before build day.
Whether you frame manually or digitally, the objective is the same: a clear, buildable plan that minimizes site corrections and keeps crews aligned. For teams that want faster updates and cleaner documentation, tools like FramingPlans can simplify wall framing layout design while keeping the process practical.